Skip to content

2024

Setting Up RuneLite for Building with IntelliJ IDEA

Setting up RuneLite for building with IntelliJ IDEA involves several steps. Here's a step-by-step guide to get you started:

Getting Started

  1. Download and Install IntelliJ IDEA: If you haven't already, download and install IntelliJ IDEA. The Community Edition is free and sufficient for RuneLite development.

  2. Install JDK 11: RuneLite is built using JDK 11. You can install this JDK version through IntelliJ IDEA itself by selecting the Eclipse Temurin (AdoptOpenJDK HotSpot) version 11 during the setup.

Importing the Project

  1. Clone RuneLite Repository: Open IntelliJ IDEA and select Check out from Version Control > Git. Then, in the URL field, enter RuneLite's repository URL: https://github.com/runelite/runelite. If you plan to contribute, fork the repository on GitHub and clone your fork instead.

  2. Open the Project: After cloning, IntelliJ IDEA will ask if you want to open the project. Confirm by clicking Yes.

Installing Lombok

  1. Install Lombok Plugin: RuneLite uses Lombok, which requires a plugin in IntelliJ IDEA.
  2. Go to File > Settings (on macOS IntelliJ IDEA > Preferences) > Plugins.
  3. In the Marketplace tab, search for Lombok and install the plugin.
  4. Restart IntelliJ IDEA after installation.

Building the Project

  1. Build with Maven: RuneLite uses Maven for dependency management and building.
  2. Locate the Maven tab on the right side of IntelliJ IDEA.
  3. Expand the RuneLite (root) project, navigate to Lifecycle, and double-click install.
  4. After building, click the refresh icon in the Maven tab to ensure IntelliJ IDEA picks up the changes.

Running the Project

  1. Run RuneLite:
  2. In the Project tab on the left, navigate to runelite -> runelite-client -> src -> main -> java -> net -> runelite -> client.
  3. Right-click the RuneLite class and select Run 'RuneLite.main()'.

Conclusion

You've now set up and run RuneLite using IntelliJ IDEA! If you encounter any issues, consult the Troubleshooting section of the RuneLite wiki for common solutions. Remember to keep both your JDK and IntelliJ IDEA up to date to avoid potential issues.
How to Write a Simple Woodcutting Script Using DreamBot API in 2024

In this tutorial, we will walk through the process of creating a simple woodcutting script using the DreamBot API. This script will allow your in-game character to autonomously chop trees, bank logs, and repeat this process indefinitely.

Prerequisites

Before we begin, ensure you have the following:

  • An Integrated Development Environment (IDE) of your choice. We will be using IntelliJ IDEA in this guide.
  • A clean project containing your script's Main class.
  • Basic understanding of Java.

Setting Up Your Project

First, you need to set up your development environment. If you need help with this, you can visit Setting Up Your Development Environment.

Next, create a new project and define your script's Main class. For help with this, visit Running Your First Script.

Creating a Woodcutting Script

Our woodcutting script will involve various tasks such as finding trees, chopping them, walking to the bank, and depositing logs. We will create different states to handle these tasks.

public enum State {
    FINDING_TREE,
    CHOPPING_TREE,
    WALKING_TO_BANK,
    BANKING,
    USEBANK,
    WALKING_TO_TREES
}

Now, we will create a method within our Main class that returns our current state:

public State getState() {
    if (Inventory.isFull() && !BANK_AREA.contains(Players.getLocal())) {
        return State.WALKING_TO_BANK;
    }
    if (!Inventory.isFull() && !TREE_AREA.contains(Players.getLocal())) {
        return State.WALKING_TO_TREES;
    }
    if (Inventory.isFull() && BANK_AREA.contains(Players.getLocal())) {
        return State.BANKING;
    }
    if (!Inventory.isFull() && TREE_AREA.contains(Players.getLocal())) {
        return State.FINDING_TREE;
    }
    return null;
}

Walking to the Bank

Define a method to handle the state of walking to the bank:

if (Inventory.isFull() && !BANK_AREA.contains(Players.getLocal())) {
    return State.WALKING_TO_BANK;
}

Next, implement the logic for walking to the bank in your main loop:

switch (getState()) {
    case WALKING_TO_BANK:
        if (!LocalPlayer.isMoving()) {
            BANK_AREA.getRandomTile().click();
        }
        break;
    // Other cases
}

Banking

Now, let's handle the banking state. We'll start by interacting with the bank booth:

if (!Bank.isOpen() && !LocalPlayer.isMoving()) {
    GameObjects.closest("Bank booth").interact("Bank");
}

Next, deposit the logs into the bank and close the bank interface:

case BANKING:
    Bank.depositAll("Logs");
    Time.sleepUntil(() -> !Inventory.contains("Logs"), 2000);
    if (!Inventory.contains("Logs")) {
        Bank.close();
    }
    break;

Walking Back to the Tree Area

To return to the tree area, we need to add a new state and corresponding logic:

if (!Inventory.isFull() && !TREE_AREA.contains(Players.getLocal())) {
    return State.WALKING_TO_TREES;
}

case WALKING_TO_TREES:
    if (!LocalPlayer.isMoving()) {
        TREE_AREA.getRandomTile().click();
    }
    break;

Finding and Chopping Trees

Finally, implement the code that finds and chops trees:

case FINDING_TREE:
    GameObject tree = GameObjects.closest(t -> t.getName().equals("Tree"));
    if (tree != null && tree.interact("Chop down")) {
        Time.sleepUntil(LocalPlayer::isAnimating, 2000);
    }
    break;

Wrapping Up

That's it! You've now created a basic woodcutting script using the DreamBot API. This script will autonomously navigate your character to chop trees, store logs in the bank, and repeat the process. Happy scripting!

Setting Up Your Development Environment For DreamBot Scripting: Intellij IDEA

In this tutorial, we'll guide you through the process of setting up your development environment for DreamBot scripting. This setup will enable you to create and execute your own scripts.

Prerequisites

Before beginning, ensure you have:

  1. The Java Development Kit (JDK) installed. Instructions are available in the Installing JDK section.
  2. DreamBot installed on your computer. Launch it at least once to access the client files.

Integrated Development Environment (IDE)

Since DreamBot scripts are written in Java, using an Integrated Development Environment (IDE) like IntelliJ IDEA can be very helpful.

Download and Install IntelliJ IDEA

Create a New Project

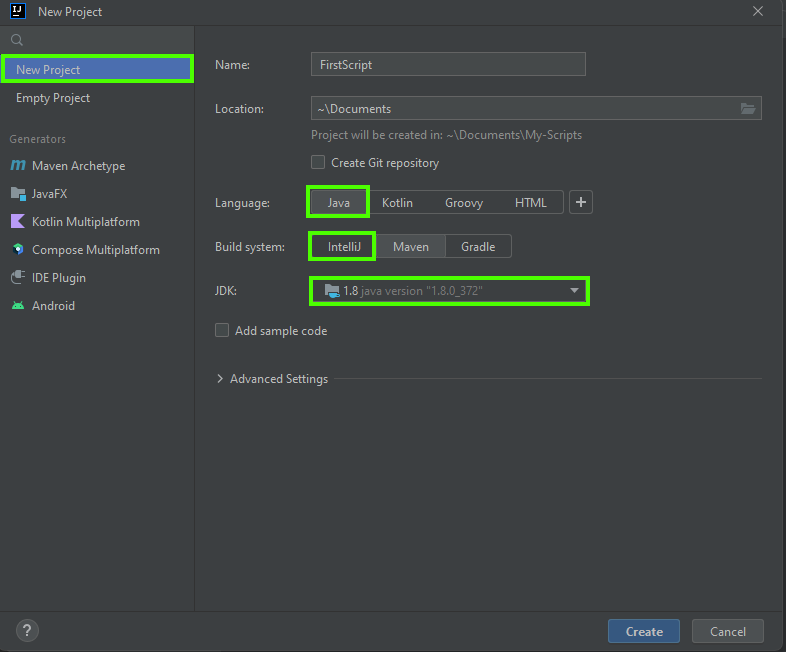
1. Open IntelliJ IDEA. 2. Click New Project. 3. Select Java, with IntelliJ as the build system. 4. Choose the JDK you downloaded earlier. 5. Name your script and set the project's save location. 6. Click Create.
Configure the Project

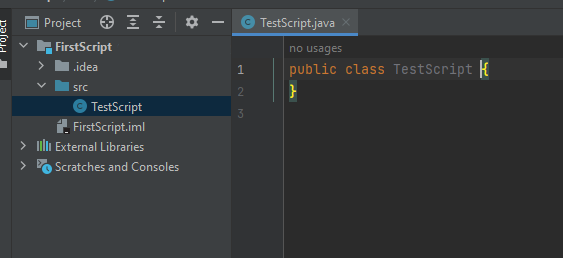
  1. Right-click the src folder and choose New -> Java Class.
  2. Name your class, e.g., "TestScript".

Add Dependencies

  1. Go to File -> Project Structure.
  2. Under Libraries, click the "+" and select Java.
  3. Navigate to the DreamBot BotData folder and choose the client.jar file.

Add an Artifact

  1. Go to File -> Project Structure.
  2. Select Artifacts.
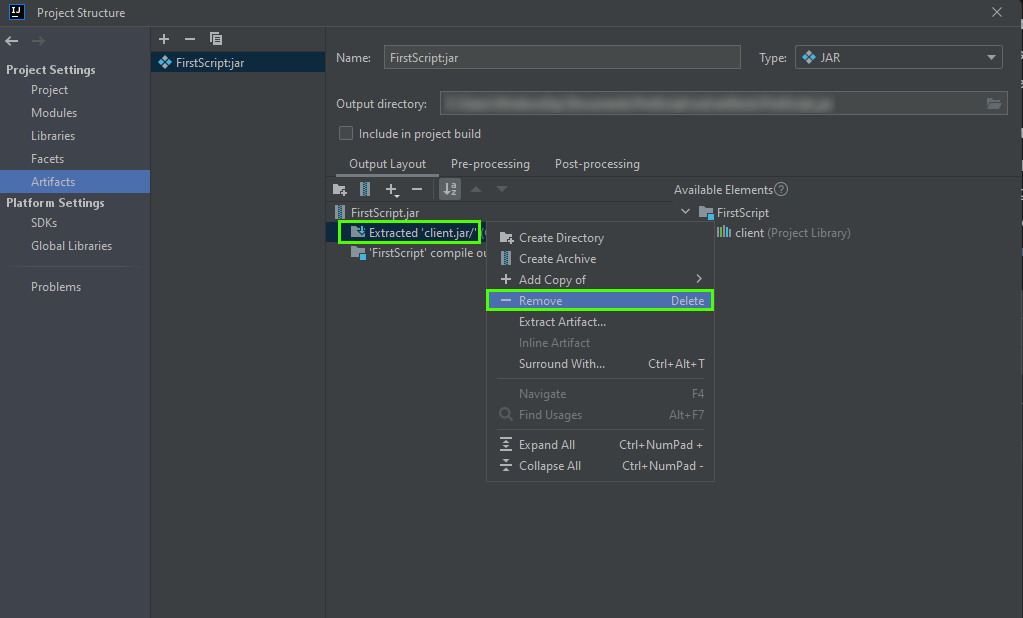
  3. Click "+" and choose JAR -> From modules with dependencies.
  4. Set the Output directory to the DreamBot Scripts folder.
    • Windows: C:\Users\YOUR_USER\DreamBot\Scripts
    • Linux/MacOS: /home/YOUR_USER/DreamBot/Scripts
  5. Exclude client.jar from the artifact by removing it from the list.

For detailed instructions on script setup and execution, refer to the Running Your First Script guide.

Summary and Expense Overview

Utilizing RAG and Langchain with GPT-4 for this blog post has been enlightening. The RAG AI Assistant has been invaluable in formulating ideas and providing project assistance. Below is the cost breakdown for using RAG AI Assistant:

  • Total Tokens Processed: 1797
  • Tokens for Prompts: 1285
  • Tokens for Completions: 512
  • Overall Expenditure (USD): $0.06927

This highlights the efficiency and cost-effectiveness of the RAG AI Assistant in content creation.