Skip to content

2024

Review of Sources for Management Investigation Report on Implementing Effective Management Practices for Home Media Servers

Overview of Home Media Server Management

When setting up a home media server, two aspects of the device which will be managing the media server are crucial: the power usage and processing power. The latest Raspberry Pi single-board computer, Raspberry Pi 5, is two to three times faster than its predecessors, with a power consumption of 25 watts (Kofler, 2024).

Plex Media Server (KL, 2024)


Its computing power, small size and low price make the Raspberry Pi SBC an ideal choice for projects, including building an at-home media service that provides on-demand access to movies, music, and other media content over the internet (KL, 2024). Popular media-streaming software like Kodi, Plex, Emby and Jellyfin can be used to stream your media content to various devices, including smart TVs, streaming boxes such as Apple TV, Chromecast and Amazon Fire TV, and mobile devices (Parkyn, 2018).

Open Source Media Server Software

After Kodi became associated with piracy, Plex emerged as a popular alternative for managing media content (Parkyn, 2018). However, we've seen key features in Plex being locked behind a paywall. Jellyfin follows the same server-client model as Plex which allows for streaming content over your network but with an added focus on privacy and open-source software (Peers, 2022). Not only that, Jellyfin can easily be run on a Raspberry Pi 3 or later models (Peers, 2020).

Media Management and Automation

Tools like Radarr, Sonarr, Prowlarr and QBittorrent can help with automating media managment on your server. By implementing these tools, you can automate the process of downloading, organizing, and streaming media content to your devices. Radarr and Sonarr are used for managing movies and TV shows, respectively, while Prowlarr acts as a proxy for accessing private torrent trackers. QBittorrent is a lightweight torrent client that can be used to download media content from various sources (Gupta, 2022).

Conclusion

The Raspberry Pi 5 is more than capable of running Jellyfin and with services like Radarr, Sonarr, Prowlarr and QBittorrent, you can automate the process of managing your media content. This creates an experience like Over The Top (OTT) third-party services such as Netflix and Hulu, but with the added benefit of privacy and control over your media library.

QIDI Plus 4 SSR Issues and Request for Replacement or Refund

Introduction

I purchased the QIDI Plus 4 3D printer from their official website on September 24, 2024 and received it on September 30, 2024. I was excited to upgrade from my Ender 3 Pro and explore the new features and capabilities of the QIDI Plus 4. I've printed primarily PLA with some PETG and TPU on the Ender 3 Pro and was looking forward to the enhanced printing experience with the QIDI Plus 4.However on October 11, 2024, I encountered a burning smell coming from the printer which seemed to be originating from underneath the poop duct. I immediately turned off the printer and unplugged it to prevent any further damage. I contacted QIDI Tech support and heard back from them a few days later.

Correspondance


In my eagerness and wanting to get back to printing, I side-stepped the issue and continued printing letting support know that the smell had dissipated. However, on November 1, the Plus 4 ran into an issue with the extruder not heating at all. I contacted support again have been waiting for a response since then.

The Primary Issue

Burning Smell

The burning smell issue and potential safety risks associated with the QIDI Plus 4 have raised significant concerns. After investigating online forums and user-reported issues, I discovered a PSA that highlighted serious safety flaws with the printer’s Solid State Relay (SSR) board responsible for the chamber heater. A video posted on YouTube by a concerned user, along with a stream by Grant from 3D Musketeers, indicated that the chamber heater and SSR board were prone to overheating due to design flaws and potential voltage mismatches.


Specifically, users reported the SSR board drawing more power than its rated capacity, which in some cases exceeded 500 watts, causing discoloration and burning on components around the heater’s coils. These findings suggest that the printer could pose a fire hazard if left unaddressed, especially for users on 120-volt systems where incorrect configurations reportedly result in excess current through the SSR board​

Secondary Issue

Extruder Heating Failure

The extruder heating failure on November 1, 2024, further compounds the safety concerns and usability issues with the QIDI Plus 4. The inability to heat the extruder prevents the printer from functioning correctly, rendering it unusable for its intended purpose. The sudden failure of a critical component like the extruder raises questions about the printer’s reliability and long-term performance. Given the safety risks associated with the SSR board and the extruder heating failure, it is evident that the QIDI Plus 4 has significant design or manufacturing flaws that need to be addressed promptly.

The Request

Replacement or Refund

Given the safety concerns and the printer’s inability to function properly, I am going to be requesting a replacement or a refund for the QIDI Plus 4. The issues encountered, including the burning smell and extruder heating failure, indicate a fundamental flaw in the printer’s design or manufacturing process. As a customer, I expect a reliable and safe product that meets the advertised specifications and quality standards. The safety risks associated with the SSR board and the potential for fire hazards are unacceptable, and I cannot continue using the printer in its current state.

Summary and Critical Evaluation of "Obstacles to Cybercrime Investigations"

UNODC (United Nations Office on Drugs and Crime) published an article titled "Obstacles to Cybercrime Investigations," which delves into the challenges faced by law enforcement agencies in investigating and prosecuting cybercrimes. This summary and critical evaluation aim to provide an overview of the key points discussed in the article, analyze its implications, and offer a critical perspective on the effectiveness of current investigative practices.

Summary

Among the various obstacles authorities must face when investigating cybercrimes, the article highlights the following key challenges:

  1. Anonymity and Anonymization Techniques: Cybercriminals exploit anonymity provided by legitimate tools like proxy servers, The Onion Router (Tor), and anonymized IP addresses to conceal their identities and activities. They're also able to host websites on the dark web allowing like-minded individuals with malicious intent to share information and tools for cybercrimes while remaining hidden.

  2. Attribution and Traceback: Determining who is responsible for cybercrime is another challenge that is made even more difficult when cybercriminals use malware-infected devices or botnets to commit crimes. Back-tracing illicit acts to their source is time-consuming and resource-intensive, especially when perpetrators use anonymization techniques to hide their identities.

  3. Legal and Evidentiary Challenges: National and international legal frameworks often have stringent communication and cooperation requirements for sharing digital evidence and information across borders. The lack of harmonized cybercrime laws and mutual legal assistance agreements hinders effective investigations and prosecutions.

Critical Evaluation

Given that one of the primary obstacles encountered by law enforcement and government agencies is "brain drain" or the loss of skilled cybercrime investigators to the private sector, private tech companies and cybersecurity firms should have a legal obligation to contribute to the public good by sharing resources and tools alongside providing training to law enforcement agencies. This would help bridge the gap between the public and private sectors, enhancing the overall capacity of law enforcement to combat cybercrime effectively. A better-trained workforce will be more willing and able to tackle the challenges posed by cybercriminals.

Adversary nations often exploit the digital infrastructure of other countries to launch cyberattacks due to the difficulty of pinpointing who the perpetrator of a cybercrime is. Training lawmakers to understand the basics of cybersecurity would be beneficial in creating more effective legislation for fighting cybercrime. This would also help in creating a more secure digital environment for citizens and businesses.

Conclusion

The article "Obstacles to Cybercrime Investigations" provides a comprehensive overview of the challenges faced by law enforcement agencies in investigating cybercrimes. By addressing the issues of anonymity, attribution, legal frameworks, and the need for enhanced cooperation between public and private sectors, authorities can better equip themselves to combat cybercriminal activities effectively. The critical evaluation suggests that a multi-faceted approach involving training, resource sharing, and legislative reforms is essential to overcome the obstacles and strengthen the investigative capabilities of law enforcement agencies in the digital age.

Time Discussion Board

Time Discussion Board Assignment

Due: Nov 1 at 11:59pm
Course: PROJ100 45520 - F24 - Intro to Project Mgmt

Describe the importance of time/schedule planning and monitoring in at least 1 paragraph

Time and schedule planning are important to ensuring project deadlines are met in their respective timeframes. Time and schedule planning minimize delays and cost overruns. According to Horine(2022), resource allocation and task prioritization are key outcomes of effective schedule planning. Furthermore, the PMBOK guide details how monitoring the schedule is crucial for early risk determination and mitigating them before they hinder the project's progress (PMI, 2017).

Describe how the critical path method (CPM) works and how it impacts the final milestone in at least 1 paragraph

The Critical Path Method (CPM) is a schedule network analysis technique that estimates the minimum project duration and determines the amount of schedule flexibility on the logical network paths within the schedule model (A Guide to the Project Management Body of Knowledge [PMBOK® Guide], 2017, p. 210). Not taking any resource limitations into account, the CPM calculates early start, early finish, late start, and late finish dates for each activity in the project. The critical path is the longest path through a project, and it determines the shortest possible project duration. The CPM impacts the final milestone by identifying which activities must be managed closely to ensure the project is completed on time.

Explain activity logic and float in at least 1 paragraph

Activity logic is the sequence and relationship between tasks in a project's schedule. It aligns the tasks in precedence order to ensure that certain tasks with prerequisites are only started once the preceding tasks are finished. Activity logic plays an important role in figuring out the critical path, the longest path through a project's activities, and the shortest possible project duration (Horine, 2022). Float or slack is the amount of time a task can be delayed before it affects the overall timeline or the start of any dependent tasks.

If you cannot build a detailed schedule, what other methods can you use to manage the project timeline? Identify at least two

Two alternative methods for managing the project timeline without a detailed schedule are milestone charts and Kanban boards. Both are helpful in providing a visual representation of the project timeline and the tasks that need to be completed.

Describe the Planning Fallacy from your article search and describe one of the ways to mitigate it in at least 1 paragraph

The Planning Fallacy is a cognitive bias that causes individuals to underestimate task durations and can hinder project timelines due to overly optimistic predictions. As Yamini and Marathe (2018) explain, people often assume tasks will follow best-case scenarios despite evidence suggesting otherwise. This bias frequently leads to procrastination and project delays, impacting the project’s schedule. One way to mitigate the Planning Fallacy is by implementing threshold-based incentives, particularly within supply chain management. Such incentives encourage employees to begin tasks early by rewarding them for time saved before a deadline. This proactive approach reduces procrastination and aligns task completion with more realistic time estimates, supporting effective schedule planning and reducing the risk of delays (Yamini & Marathe, 2018).

References

  • Horine, G.M., (2022). Project Management Absolute Beginner’s Guide. Que. Fifth Edition.

  • Project Management Institute. (2017). A Guide to the Project Management Body of Knowledge (PMBOK® Guide) – Sixth Edition and The Standard for Project Management (ENGLISH): Vol. Sixth edition. Project Management Institute.

  • Yamini, S., & Marathe, R. R. (2018). Mathematical model to mitigate planning fallacy and to determine realistic delivery time. IIMB Management Review (Elsevier Science), 30(3), 242–257. https://doi-org.columbiabasin.idm.oclc.org/10.1016/j.iimb.2018.05.003

QIDI Plus 4 Bed Mesh Correction Process

QIDI Plus 4

Introduction

Upgrading from the Ender 3 Pro to the QIDI Plus 4 was an exciting step forward, but it introduced me to a new component of 3D printing technology. Having never used Fluidd or Automatic Bed Leveling (ABL) before, I knew I had to experiment. The transition from manually leveling a print bed to utilizing these advanced tools posed a change, albeit a welcomed one. After several calibration attempts, adjustments, and refinements, I achieved an acceptable variance in the range of the bed mesh. In this article, I’ll walk you through the step-by-step process that transformed my bed mesh from highly uneven to leveled.

The Initial Bed Mesh Reading

Upon starting the first calibration with Fluidd, the bed mesh data was clear—the bed was far from level. The range between the highest and lowest points was 4.5341, with the lower end at -2.6816 and the highest at 2.0525. This much variance was causing severe print issues, including poor adhesion and inconsistent first layers.

Initial Bed Mesh

Step 1: First Adjustments and Hex Nut Corrections

I started by focusing on the front right and back right corners, the highest points on the bed. My first instinct was to loosen these hex nuts to bring the bed down in these areas. After running the ABL calibration, the mesh improved slightly, but the range was still significant, increasing slightly to 4.6741.

Slight Improvement

Noticing the small improvement but the persistent issue, I realized I needed to focus on the back left corner, which was too low. I tightened this hex nut to raise that section of the bed.

Step 2: Incremental Tightening and Loosening

With small adjustments to the hex nuts, I saw a real difference. Using a methodical approach, I turned each hex nut 25 degrees at a time:

  • I tightened the back right nut by four 25-degree turns to bring down the higher side.
  • I then loosened the back left hex nut by two 25-degree turns to raise the lower corner.

These incremental adjustments began to close the gap, reducing the range between the high and low points and creating a more even bed. The bed mesh range was now at 1.5309—a significant improvement from where I started.

Improved Mesh

Step 3: Fine-Tuning the Bed Level

After each adjustment, I recalibrated the bed using Fluidd’s automatic bed leveling tool. The mesh had become much more balanced, but there was still room for improvement. I continued making small changes:

  • I tightened the front left hex nut slightly to lower the high points.
  • I continued loosening the back left hex nut to gradually raise the back left edge.

After each adjustment, I recalibrated and checked the bed mesh results to see how the bed was leveling out.

Step 4: Achieving a Bed Mesh Range Under 0.5

After multiple rounds of precise tightening and loosening, the bed mesh finally reached a balanced state with a range of 0.3913. The highest point on the bed was 1.1743, while the lowest was -0.5825. This marked a significant improvement from where I started, bringing the bed to an acceptable level. With a range under 0.5, the bed was now flat enough to provide a stable surface for consistent, high-quality prints.

Final Bed Mesh

Conclusion

By methodically tightening the hex nuts using a socket wrench with a 15 mm hex socketR for tightening and L for loosening—and utilizing Fluidd’s automatic bed leveling tool to calibrate and check the bed mesh, I was able to greatly improve the levelness of my print bed. Achieving a balanced mesh allows for a consistent first layer, solving many of the adhesion and printing issues I had encountered earlier. Though the process requires time and attention, fine-tuning the bed level is essential for successful prints when using ABL technology. With patience and persistence, anyone can achieve a perfectly leveled bed mesh on their 3D printer.

Setting Up RuneLite for Building with IntelliJ IDEA

Setting up RuneLite for building with IntelliJ IDEA involves several steps. Here's a step-by-step guide to get you started:

Getting Started

  1. Download and Install IntelliJ IDEA: If you haven't already, download and install IntelliJ IDEA. The Community Edition is free and sufficient for RuneLite development.

  2. Install JDK 11: RuneLite is built using JDK 11. You can install this JDK version through IntelliJ IDEA itself by selecting the Eclipse Temurin (AdoptOpenJDK HotSpot) version 11 during the setup.

Importing the Project

  1. Clone RuneLite Repository: Open IntelliJ IDEA and select Check out from Version Control > Git. Then, in the URL field, enter RuneLite's repository URL: https://github.com/runelite/runelite. If you plan to contribute, fork the repository on GitHub and clone your fork instead.

  2. Open the Project: After cloning, IntelliJ IDEA will ask if you want to open the project. Confirm by clicking Yes.

Installing Lombok

  1. Install Lombok Plugin: RuneLite uses Lombok, which requires a plugin in IntelliJ IDEA.
  2. Go to File > Settings (on macOS IntelliJ IDEA > Preferences) > Plugins.
  3. In the Marketplace tab, search for Lombok and install the plugin.
  4. Restart IntelliJ IDEA after installation.

Building the Project

  1. Build with Maven: RuneLite uses Maven for dependency management and building.
  2. Locate the Maven tab on the right side of IntelliJ IDEA.
  3. Expand the RuneLite (root) project, navigate to Lifecycle, and double-click install.
  4. After building, click the refresh icon in the Maven tab to ensure IntelliJ IDEA picks up the changes.

Running the Project

  1. Run RuneLite:
  2. In the Project tab on the left, navigate to runelite -> runelite-client -> src -> main -> java -> net -> runelite -> client.
  3. Right-click the RuneLite class and select Run 'RuneLite.main()'.

Conclusion

You've now set up and run RuneLite using IntelliJ IDEA! If you encounter any issues, consult the Troubleshooting section of the RuneLite wiki for common solutions. Remember to keep both your JDK and IntelliJ IDEA up to date to avoid potential issues.

How to Write a Simple Woodcutting Script Using DreamBot API in 2024

In this tutorial, we will walk through the process of creating a simple woodcutting script using the DreamBot API. This script will allow your in-game character to autonomously chop trees, bank logs, and repeat this process indefinitely.

Prerequisites

Before we begin, ensure you have the following:

  • An Integrated Development Environment (IDE) of your choice. We will be using IntelliJ IDEA in this guide.
  • A clean project containing your script's Main class.
  • Basic understanding of Java.

Setting Up Your Project

First, you need to set up your development environment. If you need help with this, you can visit Setting Up Your Development Environment.

Next, create a new project and define your script's Main class. For help with this, visit Running Your First Script.

Creating a Woodcutting Script

Our woodcutting script will involve various tasks such as finding trees, chopping them, walking to the bank, and depositing logs. We will create different states to handle these tasks.

public enum State {
    FINDING_TREE,
    CHOPPING_TREE,
    WALKING_TO_BANK,
    BANKING,
    USEBANK,
    WALKING_TO_TREES
}

Now, we will create a method within our Main class that returns our current state:

public State getState() {
    if (Inventory.isFull() && !BANK_AREA.contains(Players.getLocal())) {
        return State.WALKING_TO_BANK;
    }
    if (!Inventory.isFull() && !TREE_AREA.contains(Players.getLocal())) {
        return State.WALKING_TO_TREES;
    }
    if (Inventory.isFull() && BANK_AREA.contains(Players.getLocal())) {
        return State.BANKING;
    }
    if (!Inventory.isFull() && TREE_AREA.contains(Players.getLocal())) {
        return State.FINDING_TREE;
    }
    return null;
}

Walking to the Bank

Define a method to handle the state of walking to the bank:

if (Inventory.isFull() && !BANK_AREA.contains(Players.getLocal())) {
    return State.WALKING_TO_BANK;
}

Next, implement the logic for walking to the bank in your main loop:

switch (getState()) {
    case WALKING_TO_BANK:
        if (!LocalPlayer.isMoving()) {
            BANK_AREA.getRandomTile().click();
        }
        break;
    // Other cases
}

Banking

Now, let's handle the banking state. We'll start by interacting with the bank booth:

if (!Bank.isOpen() && !LocalPlayer.isMoving()) {
    GameObjects.closest("Bank booth").interact("Bank");
}

Next, deposit the logs into the bank and close the bank interface:

case BANKING:
    Bank.depositAll("Logs");
    Time.sleepUntil(() -> !Inventory.contains("Logs"), 2000);
    if (!Inventory.contains("Logs")) {
        Bank.close();
    }
    break;

Walking Back to the Tree Area

To return to the tree area, we need to add a new state and corresponding logic:

if (!Inventory.isFull() && !TREE_AREA.contains(Players.getLocal())) {
    return State.WALKING_TO_TREES;
}

case WALKING_TO_TREES:
    if (!LocalPlayer.isMoving()) {
        TREE_AREA.getRandomTile().click();
    }
    break;

Finding and Chopping Trees

Finally, implement the code that finds and chops trees:

case FINDING_TREE:
    GameObject tree = GameObjects.closest(t -> t.getName().equals("Tree"));
    if (tree != null && tree.interact("Chop down")) {
        Time.sleepUntil(LocalPlayer::isAnimating, 2000);
    }
    break;

Wrapping Up

That's it! You've now created a basic woodcutting script using the DreamBot API. This script will autonomously navigate your character to chop trees, store logs in the bank, and repeat the process. Happy scripting!

Setting Up Your Development Environment For DreamBot Scripting: Intellij IDEA

In this tutorial, we'll guide you through the process of setting up your development environment for DreamBot scripting. This setup will enable you to create and execute your own scripts.

Prerequisites

Before beginning, ensure you have:

  1. The Java Development Kit (JDK) installed. Instructions are available in the Installing JDK section.
  2. DreamBot installed on your computer. Launch it at least once to access the client files.

Integrated Development Environment (IDE)

Since DreamBot scripts are written in Java, using an Integrated Development Environment (IDE) like IntelliJ IDEA can be very helpful.

Download and Install IntelliJ IDEA

Create a New Project

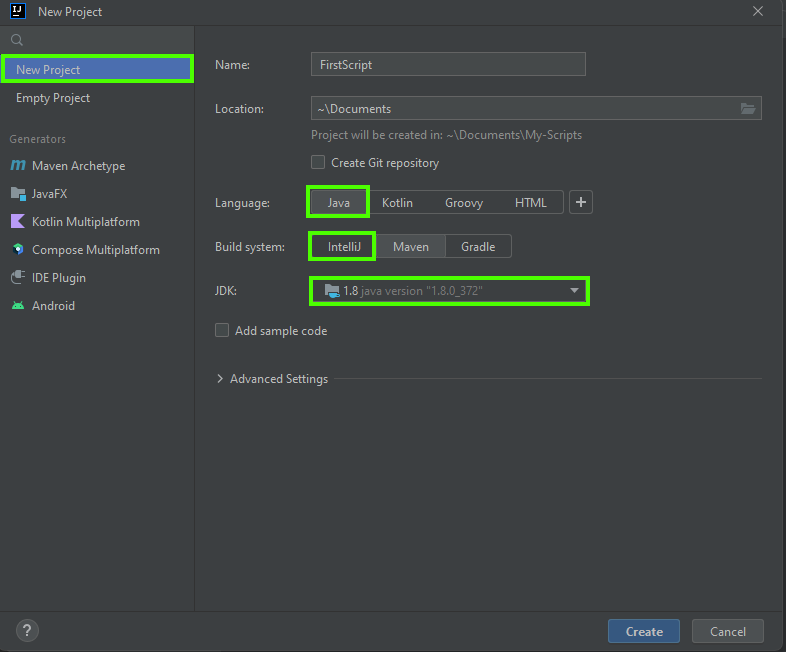
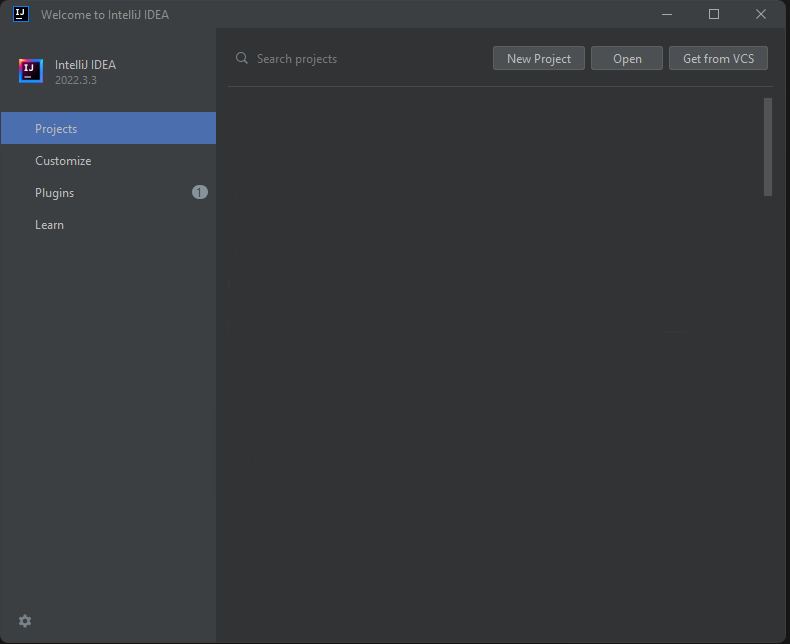
1. Open IntelliJ IDEA. 2. Click New Project. 3. Select Java, with IntelliJ as the build system. 4. Choose the JDK you downloaded earlier. 5. Name your script and set the project's save location. 6. Click Create.

Configure the Project

  1. Right-click the src folder and choose New -> Java Class.
  2. Name your class, e.g., "TestScript".

Add Dependencies

  1. Go to File -> Project Structure.
  2. Under Libraries, click the "+" and select Java.
  3. Navigate to the DreamBot BotData folder and choose the client.jar file.

Add an Artifact

  1. Go to File -> Project Structure.
  2. Select Artifacts.
  3. Click "+" and choose JAR -> From modules with dependencies.
  4. Set the Output directory to the DreamBot Scripts folder.
    • Windows: C:\Users\YOUR_USER\DreamBot\Scripts
    • Linux/MacOS: /home/YOUR_USER/DreamBot/Scripts
  5. Exclude client.jar from the artifact by removing it from the list.

For detailed instructions on script setup and execution, refer to the Running Your First Script guide.

Summary and Expense Overview

Utilizing RAG and Langchain with GPT-4 for this blog post has been enlightening. The RAG AI Assistant has been invaluable in formulating ideas and providing project assistance. Below is the cost breakdown for using RAG AI Assistant:

  • Total Tokens Processed: 1797
  • Tokens for Prompts: 1285
  • Tokens for Completions: 512
  • Overall Expenditure (USD): $0.06927

This highlights the efficiency and cost-effectiveness of the RAG AI Assistant in content creation.