Skip to content

Python

Downloading Teri Meri Doriyaann using Python and BeautifulSoup

Teri Meri Dooriyann

Overview

In today's streaming-dominated era, accessing specific international content like the Hindi serial "Teri Meri Doriyaann" can be challenging due to regional restrictions or subscription barriers. This blog delves into a Python-based solution to download episodes of "Teri Meri Doriyaann" from a website using BeautifulSoup and Selenium.

Disclaimer

Important Note: This tutorial is intended for educational purposes only. Downloading copyrighted material without the necessary authorization is illegal and violates many websites' terms of service. Please ensure you comply with all applicable laws and terms of service.

Prerequisites

  • A working knowledge of Python.
  • Python environment set up on your machine.
  • Basic understanding of HTML structures and web scraping concepts.

Setting Up the Scraper

The script provided utilizes Python with the Selenium package for browser automation and BeautifulSoup for parsing HTML. Here’s a step-by-step breakdown:

Setup Logging

The first step involves setting up logging to monitor the script's execution and troubleshoot any issues.

import logging
# Setup Logging

def setup_logger():
logger = logging.getLogger(**name**)
logger.setLevel(logging.INFO)

    file_handler = logging.FileHandler("teri-meri-doriyaann-downloader.log", mode="a")
    log_format = logging.Formatter(
        "%(asctime)s - %(name)s - [%(levelname)s] [%(pathname)s:%(lineno)d] - %(message)s - [%(process)d:%(thread)d]"
    )
    file_handler.setFormatter(log_format)
    logger.addHandler(file_handler)

    console_handler = logging.StreamHandler()
    console_handler.setFormatter(log_format)
    logger.addHandler(console_handler)

    return logger

logger = setup_logger()

Selenium Automation Class

Selenium simulates browser interactions. The SeleniumAutomation class contains methods for opening web pages, extracting video links, and managing browser tasks.

from selenium import webdriver

    # Selenium Automation

    class SeleniumAutomation:
    def **init**(self, driver):
    self.driver = driver

        def open_target_page(self, url):
            self.driver.get(url)
            time.sleep(5)

The extract_video_links method in the SeleniumAutomation class is crucial. It navigates web pages and extracts video URLs.

    def extract_video_links(self):
        results = {"videos": []}
        try: # Current date in the desired format DD-Month-YYYY
        current_date = datetime.datetime.now().strftime("%d-%B-%Y")

                    link_selector = f'//*[@id="content"]/div[5]/article[1]/div[2]/span/h2/a'
                    if WebDriverWait(self.driver, 10).until(
                        EC.element_to_be_clickable((By.XPATH, link_selector))
                    ):
                        self.driver.find_element(By.XPATH, link_selector).click()
                        time.sleep(30)  # Adjust the timing as needed

                        first_video_player = "/html/body/div[1]/div[2]/div/div/div[1]/div/article/div[3]/center/div/p[14]/a"
                        second_video_player = "/html/body/div[1]/div[2]/div/div/div[1]/div/article/div[3]/center/div/p[12]/a"

                        for player in [first_video_player, second_video_player]:
                            if WebDriverWait(self.driver, 10).until(
                                EC.element_to_be_clickable((By.XPATH, player))
                            ):
                                self.driver.find_element(By.XPATH, player).click()
                                time.sleep(10)  # Adjust the timing as needed
                                # Switch to the new tab that contains the video player
                                self.driver.switch_to.window(self.driver.window_handles[1])
                                elements = self.driver.find_elements(By.CSS_SELECTOR, "*")
                                for element in elements:
                                    if element.tag_name == "iframe" and element.get_attribute("src"):
                                        logger.info(f"Element: {element.get_attribute('outerHTML')}")
                                        try:
                                            video_url = element.get_attribute("src")
                                        except Exception as e:
                                            logger.error(f"Error getting video URL: {e}")
                                            continue

                                        self.driver.get(video_url)
                                        elements = self.driver.find_elements(By.CSS_SELECTOR, "*")
                                        for element in elements:
                                            if element.tag_name == "video" and element.get_attribute("src") and element.get_attribute("src").endswith(".mp4"):
                                                logger.info(f"Element: {element.get_attribute('outerHTML')}")
                                                try:
                                                    video_url = element.get_attribute("src")
                                                except Exception as e:
                                                    logger.error(f"Error getting video URL: {e}")
                                                    continue

                                                logger.info(f"Video URL: {video_url}")
                                                response = requests.get(video_url, stream=True)
                                                with open(f"E:\\Plex\\Teri Meri Doriyaann\\{datetime.datetime.now().strftime('%m-%d-%Y')}.mp4", "wb") as f:
                                                    for chunk in response.iter_content(chunk_size=1024*1024):
                                                        logger.info(f"Writing chunk {chunk}")
                                                        if chunk:
                                                            f.write(chunk)
                                                            logger.info(f"Chunk {chunk} written")
                                                            break

                except Exception as e:
                    logger.error(f"Error in extract_video_links: {e}")

            def close_browser(self):
                self.driver.quit()

Video Scraper Class

VideoScraper manages the scraping process, from initializing the web driver to saving the extracted video links.

    # Video Scraper
    class VideoScraper:
    def **init**(self):
    self.user = os.getlogin()
    self.selenium = None

        def setup_driver(self):
            # Set up ChromeDriver service
            service = Service()
            options = webdriver.ChromeOptions()
            options.add_argument(f"--user-data-dir=C:\\Users\\{self.user}\\AppData\\Local\\Google\\Chrome\\User Data")
            options.add_argument("--profile-directory=Default")
            return webdriver.Chrome(service=service, options=options)

        def start_scraping(self):
            try:
                self.selenium = SeleniumAutomation(self.setup_driver())
                self.selenium.open_target_page("https://www.desi-serials.cc/watch-online/star-plus/teri-meri-doriyaann/")
                videos = self.selenium.extract_video_links()
                self.save_videos(videos)
            finally:
                if self.selenium:
                    self.selenium.close_browser()

        def save_videos(self, videos):
            with open("desi_serials_videos.json", "w", encoding="utf-8") as file:
                json.dump(videos, file, ensure_ascii=False, indent=4)

Running the Scraper

The script execution brings together all the components of the scraping process.

    if **name** == "**main**":
        os.system("taskkill /im chrome.exe /f")
        scraper = VideoScraper()
        scraper.start_scraping()

Conclusion

This script demonstrates using Python's web scraping capabilities for specific content access. It highlights the use of Selenium for browser automation and BeautifulSoup for HTML parsing. While focused on a specific TV show, the methodology is adaptable for various web scraping tasks.

Use such scripts responsibly and within legal and ethical boundaries. Happy scraping and coding!

References

Automating DVR Surveillance Feed Analysis Using Selenium and Python

Introduction

In an era where security and monitoring are paramount, leveraging technology to enhance surveillance systems is crucial. Our mission is to automate the process of capturing surveillance feeds from a DVR system for analysis using advanced computer vision techniques. This task addresses the challenge of accessing live video feeds from DVRs that do not readily provide direct stream URLs, such as RTSP, which are essential for real-time video analysis.

The Challenge

Many DVR (Digital Video Recorder) systems, especially older models or those using proprietary software, do not offer an easy way to access their video feeds for external processing. They often stream video through embedded ActiveX controls in web interfaces, which pose a significant barrier to automation due to their closed nature and security restrictions.

Our Approach

To overcome these challenges, we propose a method that automates a web browser to periodically capture screenshots of the DVR's camera screens. These screenshots can then be analyzed using a computer vision model to transcribe or interpret the activities captured by the cameras. Our tools of choice are Selenium, a powerful tool for automating web browsers, and Python, a versatile programming language with extensive support for image processing and machine learning.

Step-by-Step Guide

  • Setting Up the Environment Selenium WebDriver: Install Selenium WebDriver compatible with your intended browser. Python Environment: Set up a Python environment with the necessary libraries (selenium, datetime, etc.).
  • Browser Automation Navigate to DVR Interface: Use Selenium to open the browser and navigate to the DVR's web interface. Handle Authentication: Automate the login process to access the camera feeds.
  • Capturing Screenshots Regular Intervals: Implement a loop in Python to capture and save screenshots of the camera feed every five seconds. Timestamped Filenames: Save the screenshots with timestamps to ensure uniqueness and facilitate chronological analysis.
  • Analyzing the Captured Screenshots Vision Model Selection: Choose a suitable computer vision model for analyzing the screenshots based on the required analysis (e.g., object detection, and movement tracking). Processing Screenshots: Feed the screenshots to the vision model either in real-time or in batches for analysis.
  • Continuous Monitoring Long-term Operation: Ensure the script can run continuously to monitor the surveillance feed over extended periods.
  • Error Handling: Implement robust error handling to manage browser timeouts, disconnections, or other potential issues.

Purpose and Benefits

This automated approach is designed to enhance surveillance systems where direct access to video streams is not available. By analyzing the DVR feeds, it can be used for various applications such as:

Security Monitoring: Detect unauthorized activities or security breaches. Data Analysis: Gather data over time for pattern recognition or anomaly detection. Event Documentation: Keep a record of events with timestamps for future reference.

Conclusion

While this approach offers a workaround to the limitations of certain DVR systems, it highlights the potential of integrating modern technology with existing surveillance infrastructure. The combination of Selenium's web automation capabilities and Python's powerful data processing and machine learning libraries opens up new avenues for enhancing security and surveillance systems.

Important Note

This method, while innovative, is a workaround and has limitations compared to direct video stream access. It is suited for scenarios where no other direct methods are available and real-time processing is not a critical requirement.

Transferring Script Files to Local System or VPS

Transferring Script Files to Local System or VPS

Local System Setup Process (Windows)

This document outlines the process for transferring a Python script and setting it up on your local system. The script, in this case, is a Facebook Marketplace Scraper that allows you to collect and manage data from online listings.

Prerequisites

Before proceeding with the setup, ensure you have the following prerequisites ready:

  • Python installed on your system (Python 3.6 or higher is recommended).
  • Access to a Google Cloud project with required credentials for Google Sheets API.
  • SQLite database support.
  • A Telegram bot token (if you wish to receive notifications).
  • Dependencies listed in the requirements.txt file provided with the script.

Setup Steps

Step 1: Obtain Script Files

1.1. Obtain the necessary script files from your source, typically provided as a ZIP archive or downloadable files. 1.2. Ensure you have the following script files:

  • fb_parser.py: The main Python script.
  • requirements.txt: A file containing the required Python dependencies.

Step 2: Install Dependencies

2.1. Open a terminal/command prompt and navigate to the directory containing the script files. 2.2. Install the required Python dependencies using the following command:

pip install -r requirements.txt
This command installs packages such as requests, beautifulsoup4, and others.

Step 3: Configure Credentials

3.1. Set up Google Cloud credentials for accessing the Google Sheets API:

  • Create or use an existing Google Cloud project.
  • Enable the Google Sheets API for your project.
  • Create OAuth 2.0 credentials for a desktop application and download the credentials.json file.
  • Place the credentials.json file in the same directory as the script.

Step 4: Initialize the Database

4.1. Initialize the SQLite database by running the following command in the script's directory:

python fb_parser.py --initdb

This command creates the SQLite database file (market_listings.db) in the script's directory.

Step 5: Configure Telegram Bot Token (Optional)

5.1. If you want to receive notifications via Telegram, edit the fb_parser.py script and update the bot_token and bot_chat_id variables with your own values.

Step 6: Run the Scraper

6.1. Start the scraper by running the following command in the script's directory:

python fb_parser.py

The scraper will begin collecting data from Facebook Marketplace listings, and notifications will be sent if configured.

Step 7: Monitor and Review

7.1. Monitor the script's output for any messages or errors. 7.2. Review the Google Sheets document to ensure that it's collecting data accurately.

Step 8: Ongoing Management

8.1. Consider setting up automated scheduling, if required, to run the scraper at specific intervals.

VPS Setup Process

Overview

This document outlines the process for transferring a Python script and setting it up on your VPS (Virtual Private Server). The script, in this case, is a Facebook Marketplace Scraper designed to collect and manage data from online listings.

Prerequisites

Before proceeding with the setup, ensure you have the following prerequisites ready:

  1. Access to a VPS: You should have access to a VPS with administrative privileges. You can obtain VPS services from providers like AWS, DigitalOcean, or any other preferred hosting provider.

  2. Operating System: The VPS should be running a compatible operating system, preferably a Linux distribution such as Ubuntu or CentOS.

  3. Python Installed: Python 3.6 or higher should be installed on your VPS. You can check the installed Python version using the python3 --version command.

  4. Access to SSH: Ensure you can access your VPS via SSH (Secure Shell) with a terminal or SSH client.

  5. Script Files: Obtain the necessary script files for the Facebook Marketplace Scraper. These files are typically provided as a ZIP archive or downloadable files.

  6. Dependencies: Review the script's documentation to identify and install any required Python dependencies.

Setup Steps

Step 1: Access Your VPS

  • Log in to your VPS using SSH. You should have received SSH credentials from your hosting provider.
    ssh username@hostname
    
    Replace username with your VPS username and your-vps-ip with the actual IP address or hostname of your VPS.

Step 2: Upload Script Files

  • Transfer the necessary script files to your VPS. You can use secure file transfer methods like SCP or SFTP to upload files from your local machine to the VPS.

Step 3: Install Python Dependencies

  • Install the required Python dependencies on your VPS. Use the package manager appropriate for your Linux distribution. For example, on Ubuntu, you can use apt-get:
    sudo apt-get update
    sudo apt-get install python3-pip
    pip3 install -r requirements.txt
    
    Replace requirements.txt with the actual filename containing the dependencies.

Step 4: Configure Credentials

  • Set up any necessary credentials for the script. This may include configuring API keys, OAuth tokens, or other authentication details required for your specific use case.
Google Sheets API
  1. Go to the Google Cloud Console.
  2. Create a new project if you don't have one.
  3. In the project dashboard, navigate to "APIs & Services" > "Credentials."
  4. Click on "Create credentials" and choose "OAuth client ID."
  5. Configure the OAuth consent screen with the necessary details.
  6. Select "Desktop App" as the application type.
  7. Create the OAuth client ID.
  8. Download the JSON credentials file (usually named credentials.json).
Telegram Bot API (Chat ID)
  1. Message the parser bot on Telegram.
  2. Navigate to the following URL in your browser:
    https://api.telegram.org/bot<yourtoken>/getUpdates
    
    Replace <yourtoken> with your bot's token.
  3. Look for the "chat" object in the response. The "id" value is your chat ID.

Step 5: Execute the Script

  • Run the Python script on your VPS. Navigate to the directory where you uploaded the script files and execute it.

    python3 fb_parser.py
    
    Replace fb_parser.py with the actual filename of the script.

  • Monitor the script's output for any messages or errors. Depending on your VPS setup, you may choose to run the script in the background using tools like nohup or within a screen session for detached operation.

Step 6: Ongoing Management

  • Consider setting up automated scheduling, if required, to run the scraper at specific intervals. You can use tools like cron for scheduling periodic tasks on your VPS.

Conclusion

Transferring script files to your local system or VPS to set up a Facebook Marketplace Scraper is a straightforward process. By following the steps outlined in this document, you can quickly get started with the scraper and begin collecting data from online listings.

References

Hosting MkDocs Documentation on GitHub Pages

This guide will walk you through the process of hosting your MkDocs documentation on GitHub Pages. By following these steps, you can make your documentation accessible online and easily share it with others.

Prerequisites

Before you begin, make sure you have the following prerequisites in place:

  • A MkDocs project set up on your local machine.
  • A GitHub account where you can create a new repository.

Steps

1. Create a GitHub Repository

  1. Go to your GitHub account and log in.

  2. Click on the "New" button to create a new repository.

  3. Enter a name for your repository, choose whether it should be public or private, and configure other repository settings as needed. Then, click "Create repository."

2. Push Your MkDocs Project to GitHub

To host your MkDocs documentation on GitHub, you need to push your local project to your GitHub repository. Follow these steps:

# Initialize a Git repository in your MkDocs project folder (if not already initialized)
cd /path/to/your/mkdocs/project
git init

# Add all the files to the Git repository and commit them
git add .
git commit -m "Initial commit"

# Link your local Git repository to your GitHub repository (replace placeholders)
git remote add origin https://github.com/your-username/your-repo.git

# Push your local repository to GitHub
git push -u origin master
Replace your-username with your GitHub username and your-repo with the name of your GitHub repository.

3. Enable GitHub Pages

GitHub Pages allows you to host static websites directly from your repository. To enable GitHub Pages for your MkDocs documentation, follow these steps:

  1. Go to your GitHub repository and click on the "Settings" tab.
  2. Scroll down to the "GitHub Pages" section and click on the "Source" dropdown menu.
  3. Select "master branch" as the source and click "Save."

4. Access Your Documentation Online

Once you have enabled GitHub Pages, your MkDocs documentation will be accessible online. To access it, go to the following URL:

https://your-username.github.io/your-repo/
Replace your-username with your GitHub username and your-repo with the name of your GitHub repository.

Conclusion

Hosting your documentation on GitHub Pages can have certain advantages in terms of accessibility and collaboration, but whether it's "safer" than keeping everything on your local device depends on your specific needs and security considerations. Here are some points to consider:

Advantages of Hosting on GitHub Pages:

  1. Accessibility: When you host your documentation on GitHub Pages, it becomes accessible online, allowing a wider audience to access it without requiring access to your local device.

  2. Version Control: GitHub provides robust version control capabilities. You can track changes, collaborate with others, and easily revert to previous versions if needed.

  3. Backup: Your documentation is stored on GitHub's servers, providing a level of backup. Even if your local device experiences issues, your documentation remains safe on GitHub.

  4. Collaboration: Hosting on GitHub allows for collaborative editing and contributions from team members or the open-source community.

  5. Availability: GitHub Pages offers high availability and uptime, ensuring your documentation is accessible to users around the world.

Security Considerations:

  1. Privacy: Make sure you understand the privacy settings of your GitHub repository. If your documentation contains sensitive information, you should keep it private and limit access.

  2. Authentication: Implement strong authentication methods for your GitHub account to prevent unauthorized access.

  3. Data Ownership: While GitHub is a reputable platform, consider that your data is hosted on third-party servers. Ensure you retain ownership of your documentation content.

  4. Backup Strategy: While GitHub provides backup, it's still a good practice to maintain your own backup of critical documentation on your local device or another secure location.

  5. Compliance: If you're subject to specific compliance regulations or security requirements, consult with your organization's IT/security team to ensure compliance when hosting documentation on third-party platforms.

In summary, hosting your documentation on GitHub Pages can enhance accessibility, collaboration, and version control. It can be a safer option for sharing and collaborating on non-sensitive documentation. However, security and privacy considerations should be evaluated, and you should ensure that your data remains secure and compliant with any applicable regulations.

Building an Indexing Pipeline for LinkedIn Skill Assessments Quizzes Repository

Creating an efficient indexing pipeline for the linkedin-skill-assessments-quizzes repository involves systematic cloning, data processing, indexing, and query service setup. This comprehensive guide will walk you through each step with detailed code snippets, leveraging the Whoosh library for indexing.

Pre-requisites

You want to create a new directory and name it linkedin_skill_assessments_quizzes, you need to first open the command prompt in the current working directory. To do this, you can use the following command in the command prompt.

cd path_to_your_current_working_directory
Replace path_to_your_current_working_directory with the actual path where you want to create the new directory.

Alternatively, on Windows, you can open the command prompt in the current working directory by clicking on the address bar and typing cmd, and pressing enter.

Once you are in the desired working directory, create a new directory named linkedin_skill_assessments_quizzes by executing the following command:

mkdir linkedin_skill_assessments_quizzes

Now navigate to this new directory by executing the following command:

cd linkedin_skill_assessments_quizzes

This is where you will be cloning the repository and creating the indexing pipeline.

Introduction

LinkedIn Skill Assessments Quizzes is a repository of quizzes for various skills. It contains MD files for each quiz. The repository is available on GitHub. The repository has over 27,400 stars and 13,600 forks. It is a popular repository that is used by many people to prepare for interviews and improve their skills.

Step 1: Cloning the Repository

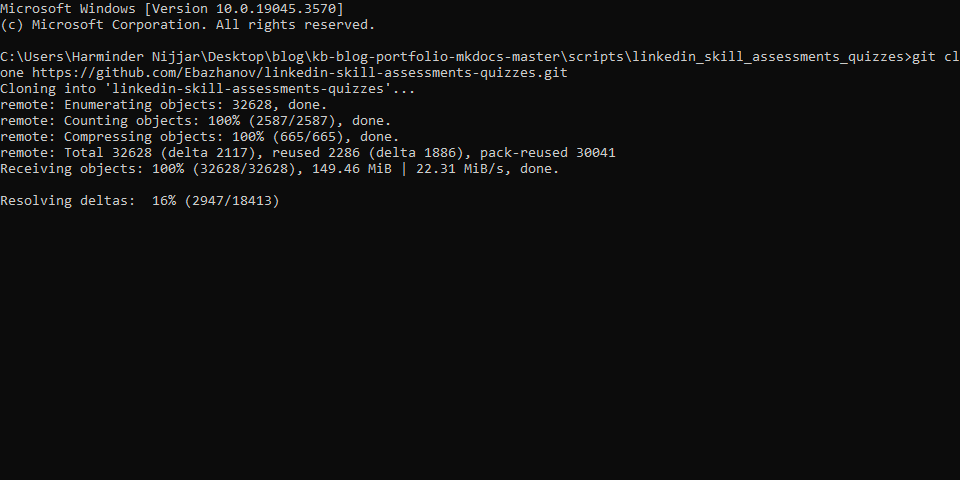
Start by cloning the repository to your local environment. This makes the content available for processing.

git clone https://github.com/Ebazhanov/linkedin-skill-assessments-quizzes.git
Cloning the repository

Step 2: Converting the MD Files to JSON

Processing the data involves parsing the MD files converting them to JSON format to extract the relevant information. The following code snippet demonstrates how to extract the question, answer, image, and options from the MD files and save them in a JSON file. This is required for indexing the data which we will cover in the next step.

Add the following code to a file named process_data.py in the same directory where you cloned the repository.

import os
import json
import markdown2
import re

# Get the markdown files directory

cloned_repository_directory = r"C:\Users\Harminder Nijjar\Desktop\blog\kb-blog-portfolio-mkdocs-master\scripts\linkedin-skill-assessments-quizzes"

# Create a folder to store the JSON files

output_folder = os.path.join(cloned_repository_directory, "json_output")

# Create the output folder if it doesn't exist

os.makedirs(output_folder, exist_ok=True)

# Create a list to store data for each MD file

data_for_each_md = []

# Iterate through the Markdown files (\*.md) in the current directory and its subdirectories

for root, dirs, files in os.walk(cloned_repository_directory):
    for name in files:
        if name.endswith(".md"): # Construct the full path to the Markdown file
            md_file_path = os.path.join(root, name)

            # Read the Markdown file
            with open(md_file_path, "r", encoding="utf-8") as md_file:
                md_content = md_file.read()

            # Split the content into sections for each question and answer
            sections = re.split(r"####\s+Q\d+\.", md_content)

            # Remove the first empty section
            sections.pop(0)

            # Create a list to store questions and answers for this MD file
            questions_and_answers = []

            # Iterate through sections and extract questions and answers
            for section in sections:
                # Split the section into lines
                lines = section.strip().split("\n")

                # Extract the question
                question = lines[0].strip()

                # Extract the answers
                answers = [line.strip() for line in lines[1:] if line.strip()]

                # Create a dictionary for this question and answers
                qa_dict = {"question": question, "answers": answers}

                # Append to the list of questions and answers
                questions_and_answers.append(qa_dict)

            # Create a dictionary for this MD file
            md_data = {
                "markdown_file": name,
                "questions_and_answers": questions_and_answers,
            }

            # Append to the list of data for each MD file
            data_for_each_md.append(md_data)

# Save JSON files in the output folder

for md_data in data_for_each_md:
    json_file_name = os.path.splitext(md_data["markdown_file"])[0] + ".json"
    json_file_path = os.path.join(output_folder, json_file_name)
    with open(json_file_path, "w", encoding="utf-8") as json_file:
        json.dump(md_data, json_file, indent=4)

print(f"JSON files created for each MD file in the '{output_folder}' folder.")w

Step 3: Indexing the Data

After processing the data, you can index it to make it searchable. Indexing refers to the process of creating an index for the data. The following code snippet demonstrates how to index the data using the Whoosh library. This is how the indexing pipeline will work.

Add the following code to a file named indexing_pipeline.py in the same directory where you cloned the repository.

import os
import json
import whoosh
from whoosh.fields import TEXT, ID, Schema
from whoosh.index import create_in

# Define the directory where your processed JSON files are located

json_files_directory = r"C:\Users\Harminder Nijjar\Desktop\blog\kb-blog-portfolio-mkdocs-master\scripts\linkedin-skill-assessments-quizzes\json_output"

# Define the directory where you want to create the Whoosh index

index_directory = r"C:\Users\Harminder Nijjar\Desktop\blog\kb-blog-portfolio-mkdocs-master\scripts\linkedin-skill-assessments-quizzes\index"

# Create the schema for the Whoosh index

schema = Schema(
markdown_file=ID(stored=True),
question=TEXT(stored=True),
answers=TEXT(stored=True),
)

# Create the index directory if it doesn't exist

os.makedirs(index_directory, exist_ok=True)

# Create the Whoosh index

index = create_in(index_directory, schema)

# Open the index writer

writer = index.writer()

# Iterate through JSON files and add documents to the index

for json_file_name in os.listdir(json_files_directory):
    if json_file_name.endswith(".json"):
        json_file_path = os.path.join(json_files_directory, json_file_name)
        with open(json_file_path, "r", encoding="utf-8") as json_file:
            json_data = json.load(json_file) # Extract 'question' and 'answers' from the JSON file
            question = json_data.get("question", "")
            answers = json_data.get("answers", []) # Combine 'question' and 'answers' into a single field for searching
            content = f"{question} {' '.join(answers)}"
            writer.add_document(
                markdown_file=json_file_name,
                question=content,
                answers=answers, # Use the extracted 'answers' or an empty list if not present
            )

# Commit changes to the index

writer.commit()

print("Indexing completed.")

Step 4: Setting Up the Query Service

After indexing the data, you can set up a query service to search the index for a given search term. The following code snippet demonstrates how to set up a query service using the Whoosh library. This is how the query service will work.

import os
import json
import re
from whoosh.index import create_in, open_dir
from whoosh.fields import Schema, TEXT, ID
from whoosh.qparser import MultifieldParser
from whoosh.analysis import StemmingAnalyzer

# Define the schema for the index

schema = Schema(
question=TEXT(stored=True, analyzer=StemmingAnalyzer()),
answer=TEXT(stored=True),
image=ID(stored=True),
options=TEXT(stored=True),
)

def create_search_index(json_files_directory, index_dir):
    if not os.path.exists(index_dir):
        os.makedirs(index_dir)

    index = create_in(index_dir, schema)
    writer = index.writer()

    for json_filename in os.listdir(json_files_directory):
        json_file_path = os.path.join(json_files_directory, json_filename)
        if json_file_path.endswith(".json"):
            try:
                with open(json_file_path, "r", encoding="utf-8") as file:
                    data = json.load(file)
                    for question_data in data["questions_and_answers"]:
                        question_text = question_data["question"]
                        answer_text = "\n".join(question_data["answers"])
                        image_id = data.get("image_id")
                        options = question_data.get("options", "")
                        writer.add_document(
                            question=question_text,
                            answer=answer_text,
                            image=image_id,
                            options=options,
                        )
            except Exception as e:
                print(f"Failed to process file {json_file_path}: {e}")

    writer.commit()
    print("Indexing completed successfully.")

def extract_correct_answer(answer_text):
    # Use regular expression to find the portion with "- [x]"
    match = re.search(r"- \[x\].\*", answer_text)
    if match:
        return match.group()
    return None

def search_index(query_str, index_dir):
    try:
        ix = open_dir(index_dir)
        with ix.searcher() as searcher:
            parser = MultifieldParser(["question", "options"], schema=ix.schema)
            query = parser.parse(query_str)
            results = searcher.search(query, limit=None)
            print(f"Search for '{query_str}' returned {len(results)} results.")
            return [
                {
                    "question": result["question"],
                    "correct_answer": extract_correct_answer(result["answer"]),
                    "image": result.get("image"),
                }
                for result in results
            ]
    except Exception as e:
        print("An error occurred during the search.")
        return []

if __name__ == "__main__":
    json_files_directory = r"C:\Users\Harminder Nijjar\Desktop\blog\kb-blog-portfolio-mkdocs-master\scripts\linkedin-skill-assessments-quizzes\json_output" # Replace with your JSON files directory path
    index_dir = "index" # Replace with your index directory path

    create_search_index(json_files_directory, index_dir)

    original_string = "Why would you use a virtual environment?"  # Replace with your actual search term
    # Remove the special characters from the original string
    query_string = re.sub(r"[^a-zA-Z0-9\s]", "", original_string)
    query_string = query_string.lower()
    query_string = query_string.strip()
    search_results = search_index(query_string, index_dir)

    if search_results:
        for result in search_results:
            print(f"Question: {result['question']}")
            # Remove the "- [x]" portion from the answer
            print(f"Correct answer: {result['correct_answer'].replace('- [x] ', '')}")
            if result.get("image"):
                print(f"Image: {result['image']}")
            print("\n")
        print(f"Search for '{original_string}' completed successfully.")
        print(f"Found {len(search_results)} results.")
    else:
        print("No results found.")

Conclusion

Creating an efficient indexing pipeline for the 'linkedin-skill-assessments-quizzes' repository involves systematic cloning, data processing, indexing, and query service setup. This comprehensive guide has walked you through each step with detailed code snippets, leveraging the Whoosh library for indexing. You should now be able to query the index and get the results. The script will print the question, answer, and image (if available) for each result.

Since the data is indexed, you can easily search for a given term and get the results. This can be useful for finding the answers to specific questions or searching for a particular topic. You can also use the query service to create a web application that allows users to search the index and get the results.

References